
Updated January 2013
So you've installed CCR and are ready to go!
(If you want to learn about the different parts of the screen click on the Nitty Gritty tab above.)
When you open CCR it defaults to the My Cartridges library and the Cricut Craft Room Basics cartridge.
The My Cartridges library will show Cricut Craft Room Basics, any cartridges you have physically linked to your acount using CCR, and any free cartridges that cricut.com have given you access to.
Currently they give us access to a different free cartridge every week. You can cut from that cartridge as much as you want for that week. Once the week is up the cartridge is removed from My Cartridges and is replaced with the next free cartridge.
If you want to cut a project that you created with the previous free cartridge you will have to purchase it from the cricut.com store.


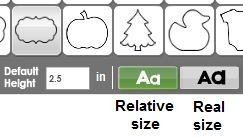
Relative vs Real size
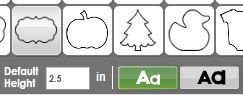
If you are cutting objects that will have layers or shadows it's important that you have the Relative size button selected. Otherwise the different layers won't fit your base object.
Also if you are typing text using Relative size will ensure that all the letters are created in proportion to each other.
The Relative size button is the first Aa button next to the Default Height box. Whichever button is active will be green.
However, if you want your object to be an exact height make sure you have Real size button selected.


First you'll learn how to add objects to the CCR mat.
When you open CCR it defaults to the My Cartridges library and the Cricut Craft Room Basics cartridge.
The My Cartridges library will show Cricut Craft Room Basics, any cartridges you have physically linked to your acount using CCR, and any free cartridges that cricut.com have given you access to.
Currently they give us access to a different free cartridge every week. You can cut from that cartridge as much as you want for that week. Once the week is up the cartridge is removed from My Cartridges and is replaced with the next free cartridge.
If you want to cut a project that you created with the previous free cartridge you will have to purchase it from the cricut.com store.

- To use a different cart scroll through the cartridge list and single click on the cart of your choice. The keypad for that cartridge will appear on your screen. (The speed that the overlay appears is partly dependent on your computers speed and the speed of your internet connection.)
- To use a cartridge that is not linked to your account you can either click on the down arrow in the Filter box and select All Cartridges (or any of the other groups of images) or;
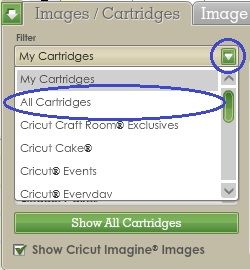
- Click the Show All Cartridges button
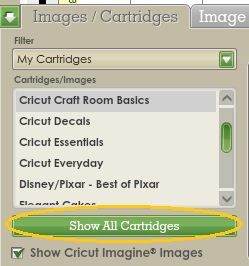
- If you want to see the Imagine cartridges make sure you check the box next to Show Cricut Imagine Images.
- Hover your mouse over one of the keypad keys. You'll see a preview of that image.

- Single click the image and if this is a new file, it will be placed in the top left corner of your screen.
- Click on the image and drag and drop it onto the mat, or
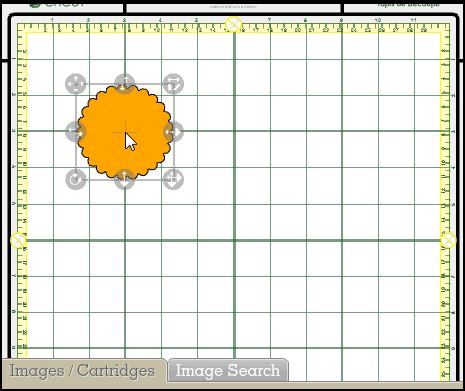
To give you an idea of where the image will be placed on the mat if you drag and drop, take note of where the arrow is as you move around the mat. In this case the arrow is sitting at 3" across and 3" down.

The centre of the image will be placed in the same spot that the arrow is shown above. A cross-hair indicates the centre of the image.

Don't double click the image key. That will just place two of the same object on your mat.

The centre of the image will be placed in the same spot that the arrow is shown above. A cross-hair indicates the centre of the image.
Don't double click the image key. That will just place two of the same object on your mat.
Setting the height of your image
To set the height of your image before you place it on the mat click in the Default Height box (just below the bottom row of keypad keys) and type in a new height.
If you are cutting objects that will have layers or shadows it's important that you have the Relative size button selected. Otherwise the different layers won't fit your base object.
Also if you are typing text using Relative size will ensure that all the letters are created in proportion to each other.
The Relative size button is the first Aa button next to the Default Height box. Whichever button is active will be green.
However, if you want your object to be an exact height make sure you have Real size button selected.
Now that your object is on the mat, what can you do with it?

By using the handles around the object you can manipulate it in various ways: stretch/shrink, slant, move and rotate.
Click and drag the various handles to see what they can do.

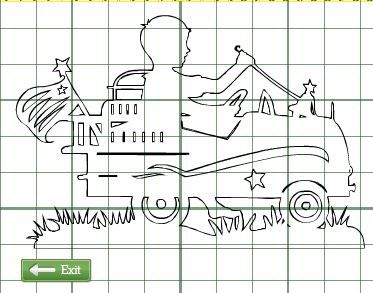
Hide Contour
You can hide certain parts of the object so they don't cut, by using the Hide Contour button.
Not every object will have a Hide Contour button. There must be at least two separate contours in the object for the Hide Contour button to be available.
In this example the object is made up of two contours - the main outline and the small contour next to her elbow. When the object is selected the Hide Contour button appears.

In this example the object is made up of only one contour - the main outline. When the object is selected the Hide Contour button doesn't appear.
Let's say we want to hide the red highlighted contours in this object.

- With the object selected, press the Hide Contour button.
As you hover your mouse over the different contours of the object you will notice that they turn red.
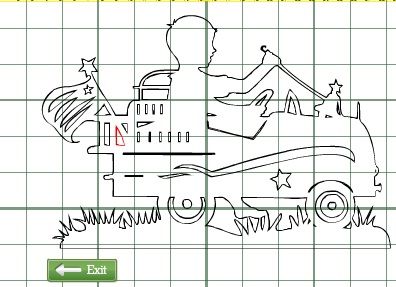
- When you are over a contour you want to hide, click your left mouse button.

Move your mouse away from the contour and you will notice that it is now a light grey colour. This indicates that the contour is hidden and won't cut.
- Continue hiding the required contours.

If you accidentally hide the wrong contour just hover over it again and left click. The contour will appear again. (It's very easy to accidentally hide the main outline of the object.)
- When you have finished hiding contours click the Exit button and you will be taken back to the main screen. Here's the finished object with those contours now hidden.

Got any questions? Just ask!


6 comments:
Just found your blog, what great info, thank you!!
You "simplify" what looks to be difficult without the proper instruction. THANK YOU!!!! Will pass your blog on to others who are just starting with CCR
Thank you so much for this. I am finally understanding how to use the CCR. I am a Gypsy expert but the CCR seems like it should be better for me. I really appreciate your time in these tutorials and hope you continue.
So excited to have found your blog. I am a brand new owner of a Cricut E2 and am feeling a little overwhelmed at times. I will be relying on your blog often ; )
How do I cut in CCR? I have an older Personal Cutter and it won't cut.
I recently purchased Explore. I subscribed to the year long images, and have no cartridges. I am trying to do a shadow for fonts. Any ideas how to do this?
Post a Comment