For information of Copying and Pasting in CCR builds from 167 on click here:
http://cricutcraftroomblog.blogspot.com.au/2013/01/copying-objects-to-new-layer-updated.html
Do you want to copy images from one mat layer and place them on a different mat layer? Well here's how you do it.
1. First, make sure you have Mat Layers enabled (Options menu, Craft Room tab).
You may also want to have Fill Mode Enabled (Options menu, Craft Room tab) but it's not necessary. For this exercise I have it turned on to make it easer to see where the layers are being pasted to.
2. Highlight the object you want to copy and click the Copy button. That image will be copied to your clipboard.
3. Click on the Mat Layers menu and click the Add New Layer button. (Figure 1). That layer will now become the active layer. You'll know that because that layer will be highlighted in grey. (Figure 2)
If you have already added your new layer make that layer active by clicking on its name in the Layers menu so that it's highlighted.
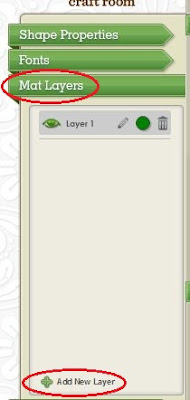 |
| Figure 1 |
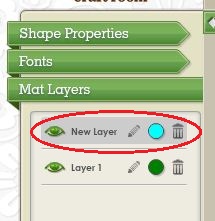 |
| Figure 2 |
4. Press the Paste button. Your object will now appear on the new layer.
You can see that it worked because the pasted object is a different colour to the original and matches the coloured dot beside the layer name.
If you wish you can now delete your original object. Or, if you want to remove (cut) your object from one layer and Paste it to another, simply press the Cut button at step 2 instead of the Copy button.
Having problems getting it to work? Keep the following in mind....
- Before you select the Paste button ensure that the layer name you are pasting to is highlighted.
- Make sure the layer you are pasting to is visible. The eye next to your layer name should be green. (Like the picture above). If the eye is grey your layer is hidden and you won't see your pasted object.
In the picture below, the layer I have pasted to is hidden. (The eye is grey.) Even though I have pasted my object it's not visible.
Once I make the layer visible the pasted image appears.


