
The most important thing to remember is that you must have Relative size selected. Otherwise each layer will be exactly the size that you have set as the Default Height. Using Relative size means that each of t-he layers of the image will be cut in proportion to the main image. (In this case the main image is the one on the Basic tab.)
You will find the Relative size button below the CCR keypad. If the button is green, it is active.

You also need to remember not to resize individual layers. You should select all the layers on your mat and resize them at the same time. More on that later!
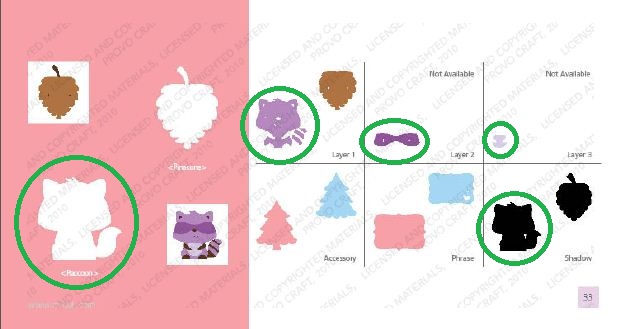
Here's an example using the Raccoon from Create A Critter.
The picture below shows you the page from the handbook that has the raccoon on it.
In this cartridge each of the layers is on its own tab.
Some cartridges though will have some of the layers on the <Shift> of the image keys.
I have circled the images that I will be using. Note that each layer is on the <Non Shift> keys.
I'll be using the Base (Basic) layer, Layer 1, Layer 2 and Layer 3. I'll also use the Shadow layer. And because I have no idea what colour a Raccoon is supposed to be I'll use the colours that are in the handbook! There's no Raccoons where I come from!!! :)
Now let's take a look at the CCR keypad for Create A Critter with the Raccoon circled.
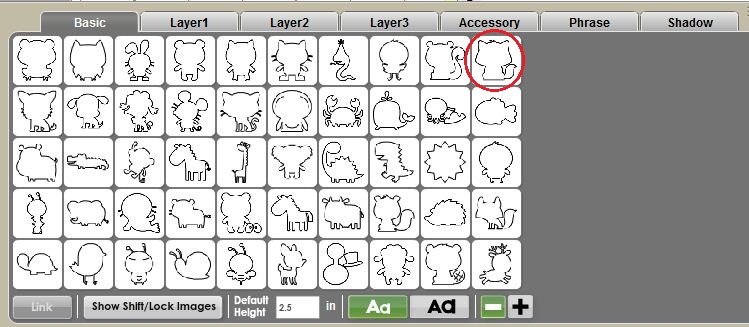
Don't forget you can zoom the keypad icons in and out by clicking on the - and + icons below the keypad. This makes it much easier to find the shape you are looking for. You should also see the name of the shape appear as you hover over the keys.

I want my finished shaped to be 2.5" in height. So I set that size in the Default Height box below the keypad.

Or you can create a new mat for each layer and send each layer to the Cricut one at a time. For this example I'm going to use a different mat for each layer.
I'm going to add the Shadow layer to the mat first because that will be the bottom layer. Each time you add a new mat it will automatically be added on top of the previous mat. (That is until you start moving your mats around.... then things get a bit messier.)
- Click on the Shadow tab, then click on the Raccoon key.
Because this is a new file the shape will automatically be placed in the top left corner of the mat. (No need to drag it there...)

I'm going to change the preview colour of this layer to black.
Remember... changing the Preview colour is different to using the Auto-fill feature. The preview colours don't print and are merely here as an aid to see what your finished project will look like. It's a great feature because you can play with different colours on the screen instead of wasting your precious card stock!
- Click on the red dot on the layer tab.

- Drag the arrow on the slider down to the bottom to change the colour to black. (That's the quickest way to get black.)
- Press the Apply button and the preview will now appear in black

- To add a new mat for the next layer click on the + button next to the Layer 1 tab.

The active layer will have a light grey coloured tab. In the picture below that is Layer 2. Notice how the tab for Layer 1 is now a darker grey meaning that it's not the active mat.

- To add the next layer to our project click on the Basic tab.
- Then click on the the Raccoon key.

The image is added to the active mat beside the shadow layer.

Next I'll change the colour of that layer. Going by the colour in the handbook I'll change it to a dark brown colour.
- Click on the Yellow dot on the Layer 2 tab.
- Click somewhere in the yellow/orange zone on the colour wheel then drag the slider down to select a darker shade.

You can move around in the colour wheel to select different shades of a colour. You can also move the slider up and down to change from light to dark tones of that colour.
- Select the shade you like then press the Apply button. (If you want to use that colour again later write down the RGB codes from the boxes below the colour wheel.)

Next we'll add the image from the Layer 1 tab.
(This can get confusing when our mat layers are called Layer 1, Layer 2 etc and so are the tabs on the cartridge keypad....!! You can rename your mat layers if that helps by double clicking on the the mat layer name and overtyping it with a new name.)
- Add another mat to your project

- Click on the Layer 1 tab on the keypad then click on the Raccoon to add it to the active mat.


- Click in the purple area of the colour wheel and use the slider to select a medium shade.

- Click Apply

Using the same method as above I'll add the two remaining layers each on their own mat.
The Layer 2 image is a dark purple and the Layer 3 image is a pale purple.
Once that's done your screen should look something like this:

You can move the shapes on each mat on top of each to see what the final image will look like when it's cut out and put together.
Click on the brown layer and slide it over the black layer and align it. Repeat for the other layers until you get something like this:

When you're ready to cut the project you can either move the shapes to different areas of the mat and cut each layer in turn. Or you can copy and paste everything to one layer, load up your mat with each of the colours and cut it all at once.
If you decide you want to resize your images make sure you select all the layers first. To do that select Ctrl A (Cmd A for the Mac) or select Edit, Select All. Then use the bottom right handle on the images to resize all the layers together. That way they'll all stay in proportion.
(If you have pressed the eye button (hide/show mat) on any of the mats, the image/s on that mat won't be selected. Press the eye button again to view those mats again. Then Select All.)
I hope that helps you with your layering!!


11 comments:
Thank you!! :) Janis
Great tutorial ... so helpful! Thank you!
Thanks so much for the info!
i am so excited about all of these step by step lessons. this layers lesson is one i have been wanting to see. i am actually printing out ALL of the lessons and i am making a hard binded book with my your story supplies from provo craft. I dont want to seal the book untill i know i have all the lessons, do you happen to know how many more lessons you will be putting together? it would also help if i could be pointed in the direction to additional lessons out there that may be on other blogs. I am not sure who else besides scrappalette you are involved with so i understand if your against doing so. once again thank you and God Bless!
I have no plans to stop the tutorials Beth. (Provided I don't run out of subject matter....) :)
I don't work with anyone other than Scrapalette. I'll let you know if Amazon come knocking on my door!!!! LOL!
If you google Cricut Craft Room Tutorials you'll find lots of lessons out there. :)
Narelle
thank you Narelle, I knew some of this, but also learned other bits I hadn't picked up yet..you are so clear, great teacher!!
thanks so much Narelle!!! i enjoyed stumbling upon another useful tutorial while checking my msgs first thing this morning! if there is something specific that i need help with do you take tutorial request? thanks have a rest of a Blessed and Jesus filled day!
Beth
Sure Beth. Just let me know what you want to know! :)
Ok so I am ready for some additional assistance on CCR if you have time. I have found an interest in making our business shirts using my E2 & Imagine to cut the font & some pics out of t shirt vinyl then the same for window decals using vinyl. I have found it rather annoying to do font on CCR. I have a gypsy & I decided to try & make a rummage sale poster using it instead of CCR & in the first few mins of just putting my words on the screen seemed soooo much easier. I havnt finished it due to busy sched but I need to & want to know is there a secret to using font in CCR. I have seen your tutorial briefly. Do you suggest using the text box will be the simplest and setting a size in the box next to
relative size option & do I keep relative selected like I do for objects? I would rather not weld most if my words. I seem to get hung trying to set up my font on the screen mat like I want it to be on my project doin moving 1 letter at a time and sizing each letter. I think thats where im messing up.please help.
Hi Beth. Using a Text box will definitely be easier than dragging letters one at a time to the mat. The beauty of using a text box is that you can type your word, then pick a different font and the word on the screen will change to that font. You will also set/change the text size while you're there. When using a text box the size defaults to 1". Just use the up/down arrows to change the size.
No need to worry about setting it to Relative size as that is done automatically when you use a text box.
Hope that helps. :)
Wow, I never noticed the plus/minus to enlarge the keypad icons! Yay! Great tutorial, I'm a new subscriber!
Post a Comment