Thanks!
Friday, June 8, 2012
Looking for a Mac user of CCR who hasn't updated yet
Update - not only did I find someone (thanks Mandy) but PC have posted a link to the old Mac version of CCR here: http://www.cricut.com/imaginedownload.aspx
If you are a Mac user of CCR and you haven't updated to Build 151 yet, could you please let me know!
craftroomblog@gmail.com
I'm after the set of Build 132 Mac files so I can help out our Mac users who have updated and now can't use their Imagine.
Thanks!
Thanks!
Using an old build of CCR
For those of you who have an Imagine you will no doubt know by now that Build 151 has most likely caused your Imagine to stop cutting. Until PC fix that problem all is not lost.
It is possible to use a previous version of CCR.
When you installed the new version you most likely installed it over the previous version. All you need to do is have the previous Craft Room files on your computer to allow you to run that version.
Here's what you need to do:
Hope that helps!
It is possible to use a previous version of CCR.
When you installed the new version you most likely installed it over the previous version. All you need to do is have the previous Craft Room files on your computer to allow you to run that version.
Here's what you need to do:
- Create a directory on your computer and call it Cricut Craft Room Build 132
- Go to this link and download all 13 files and save them into the directory you just created
- Once you have downloaded those files go to this directory on your computer: C:/Program Files/Cricut Craft Room. You will see 4 sub-folders there called assets, Drivers, icons and META-INF. Copy those four folders (and all their contents) to your Cricut Craft Room Build 132 directory. (Highlight all four folders and press Ctrl C. Then navigate to your Build 132 directory and press Ctrl V. You now have the full set of files required to run CCR Build 132. Next you'll create a shortcut for your desktop to open that version
- While you're at the Cricut Craft Room Build 132 directory highlight the Cricut-Craft Room.exe file (its type will be Application and its size should be 139KB) and press Ctrl C.
- Right click on your desktop and select Paste Shortcut. (Don't just select Paste as you'll get an error when you try to open it. You need to select Paste Shortcut.)
- Right click the new icon on your desktop and select Rename. Add Build 132 to the end of the shortcut name.
- Now you can use that shortcut to open Build 132. Use that icon whenever you want to use the old build.
Hope that helps!
Tuesday, June 5, 2012
CCR update news
It's a big news day in Cricut Craft Room today. There is a program update available for download (build 151) plus there are five new CCR exclusive cartridges available.
When you next open CCR you will be prompted to update. There's no need to uninstall the current version. If you want to be able to go back to the previous version you'll need to copy all the files from C:/Program Files/Cricut-Craft Room to another directory on your computer. I create a directory on my computer and call it whatever Build it applies to eg. CCR Build 132. Then if I need to use the previous version I just click on the Cricut-Craft Room.exe file in that directory.
So, what's new in this build?
Well, first - what it doesn't have is the much anticipated Gypsy Link option. (Although it has been renamed to Gypsy Sync. Is that progress?)
Also, Kate's Kitchen still isn't working with CCR. (The images show up on the keypad but nothing happens when you click on one of the keys.)
One other setback (for me anyway) is cutting with the Imagine. Where before I rarely had a problem printing and cutting with the Imagine, now my mat is being spat out after the image is printed. I'll keep working on that and see if I can get it working. (I never give up!!!)
Edited to add: So it appears it's not just me that is having the Imagine cutting problem with this update. If you have an Imagine and want to use CCR you will have to use Build 132. I mentioned above that you can save previous versions to your computer so you can go back to them. You'll find more info with instructions and a link to the files that you'll need to download if you've already installed Build 151 here: http://cricutcraftroomblog.blogspot.com.au/2012/06/using-old-build-of-ccr.html
On to what is new...
Here's the blurb from the notices section of CCR with my comments:
When you next open CCR you will be prompted to update. There's no need to uninstall the current version. If you want to be able to go back to the previous version you'll need to copy all the files from C:/Program Files/Cricut-Craft Room to another directory on your computer. I create a directory on my computer and call it whatever Build it applies to eg. CCR Build 132. Then if I need to use the previous version I just click on the Cricut-Craft Room.exe file in that directory.
So, what's new in this build?
Well, first - what it doesn't have is the much anticipated Gypsy Link option. (Although it has been renamed to Gypsy Sync. Is that progress?)
Also, Kate's Kitchen still isn't working with CCR. (The images show up on the keypad but nothing happens when you click on one of the keys.)
One other setback (for me anyway) is cutting with the Imagine. Where before I rarely had a problem printing and cutting with the Imagine, now my mat is being spat out after the image is printed. I'll keep working on that and see if I can get it working. (I never give up!!!)
Edited to add: So it appears it's not just me that is having the Imagine cutting problem with this update. If you have an Imagine and want to use CCR you will have to use Build 132. I mentioned above that you can save previous versions to your computer so you can go back to them. You'll find more info with instructions and a link to the files that you'll need to download if you've already installed Build 151 here: http://cricutcraftroomblog.blogspot.com.au/2012/06/using-old-build-of-ccr.html
On to what is new...
Here's the blurb from the notices section of CCR with my comments:
Cricut Craft Room™ update: June 5, 2012
- New image insertion cursor! Click on the virtual mat to position the cursor. Click an image from the image drawer and it will add to the mat to the right of the cursor.
I love this feature! Although it would be nice if the cursor could be a little less intrusive, maybe by making it grey instead of black. The size of the cursor will be dependant on what you have set as your Dial Size in the Options menu, Craft Room tab.
Just single click somewhere on your mat and wherever your cursor is, is where your object will be placed. No more having to move images around or drag them from the keypad to where you want them.
- Cricut Expression®, Cricut Create®, and Cricut® Personal Cutter machines have a new load and unload mat buttons. Now you can leave your mat loaded between cuts! This makes it easy to align scoring, drawing and cutting.
This is great news! Do I smell the scent of TBBM2 arriving in CCR soon? Breaking news... TBBM2 is now on CCR!!!
- Cricut Expression 2 (1000 fw version) now can automatically cut from Cricut Craft Room™ with the Cricut Alphabet and Cricut Essentials cartridges.
Good news for all those who have the 1000 firmware version E2's who haven't been able to cut with their pre-loaded cartridges in CCR!
- Sort your saved projects two ways, by name or by date modified!
I've been hoping they'd add something like that.
- Bug fixes for placement of certain images
- Bug fixes for importing Cricut DesignStudio® projects (that have been saved as .gypsy files) into Cricut Craft Room™
Hopefully I'll get time to test that out soon.
- Cutting speed improvements for Cricut Expression 2
Loving the new speed!! I tested it out this morning and it cuts so much faster now!! Of course now I don't have time to go make a coffee while my project is cutting!
- ‘Save As’ added so you can easily make copies of your projects or use a project as a template.
This is in addition to the Save As that was added into the File menu. Now it appears in the menu in the top right corner of the CCR screen.
When you go to start a new project, open another project or logout, you will be asked whether you want to save the current project. If you say NO any changes you made won't be saved. If his was a new project it will be deleted. I like this idea because most projects I create I have no need to save. Often I'm just playing around with new carts or cutting something simple that I don't need to save. Now those files won't automatically be added to my projects list.
One addition that wasn't mentioned above is that when you login to CCR now, the Cartridge library will default to My Cartridges.
If anything else crops up I'll update this post.
Now onto the new cartridges.
Just in time for your Independence Day celebrations are Independence Day - 3D projects, Independence Day - Celebrate and Independence Day - Freedom. Also new is Bag Toppers - Summer and Doodlecharms - Life. Check them out at cricut.com!
Enjoy!

Labels:
Update
Thursday, May 17, 2012
Digital Cartridges on sale!
In case you don't get emails from cricut.com you might not be aware that all Cricut Digital carts are currently 20% off! This offer is for this week only and expires May 22, 2012.
There's also a great Bundle deal on Summer Vacation, Summer in Paris & Summer Celebrations digital carts. Get all three for $49.99. (That one is sitting in my Shopping Basket right now just waiting for me to go find my credit card!!)
And don't forget, if you're in the Circle you get an additional 10% off on top of that!
http://main.cricut.com/shopping/ProductLanding.aspx
Happy Shopping!!
There's also a great Bundle deal on Summer Vacation, Summer in Paris & Summer Celebrations digital carts. Get all three for $49.99. (That one is sitting in my Shopping Basket right now just waiting for me to go find my credit card!!)
And don't forget, if you're in the Circle you get an additional 10% off on top of that!
http://main.cricut.com/shopping/ProductLanding.aspx
Happy Shopping!!
Friday, April 20, 2012
TBBM2 - and then it was gone....
Sad face here.... TBBM2 has been removed from CCR. One of the message board members (thanks The Soap Lady) mentioned that the Score lines didn't show up. So maybe this is why it was removed.
Maybe it was just added while they tested it.... who knows? I've seen new carts appear on CCR for a short time then disappear. (Dora the Explorer ring a bell???)
Anyway... such is life. Hopefully it'll be back up there lickety split. My Expression2 keeps asking me when she can play with that cart!!! She had her hopes up for a day... I've had to keep feeding her Easter Eggs (via me) to cheer her up!
Just to cheer you up here's my favourite picture at the moment. I found it on the internet the other day (and already I can't remember where.... because I'd like to say thanks!!). Hope it makes you laugh out loud like it did me!!
Maybe it was just added while they tested it.... who knows? I've seen new carts appear on CCR for a short time then disappear. (Dora the Explorer ring a bell???)
Anyway... such is life. Hopefully it'll be back up there lickety split. My Expression2 keeps asking me when she can play with that cart!!! She had her hopes up for a day... I've had to keep feeding her Easter Eggs (via me) to cheer her up!
Just to cheer you up here's my favourite picture at the moment. I found it on the internet the other day (and already I can't remember where.... because I'd like to say thanks!!). Hope it makes you laugh out loud like it did me!!
Labels:
TBBM2
Thursday, April 19, 2012
Tags, Bags, Boxes and More 2
Breaking news just in....
TBBM2 is now on CCR! Thanks to the very observent Kerstin from the message board for pointing it out!!
Labels:
TBBM2
Tuesday, April 10, 2012
Copying objects to a new layer (for CCR builds prior to 167)
For information of Copying and Pasting in CCR builds from 167 on click here: http://cricutcraftroomblog.blogspot.com.au/2013/01/copying-objects-to-new-layer-updated.html
Do you want to copy images from one mat layer and place them on a different mat layer? Well here's how you do it.
1. First, make sure you have Mat Layers enabled (Options menu, Craft Room tab).
You may also want to have Fill Mode Enabled (Options menu, Craft Room tab) but it's not necessary. For this exercise I have it turned on to make it easer to see where the layers are being pasted to.
2. Highlight the object you want to copy and click the Copy button. That image will be copied to your clipboard.
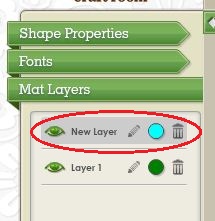
3. Click on the Mat Layers menu and click the Add New Layer button. (Figure 1). That layer will now become the active layer. You'll know that because that layer will be highlighted in grey. (Figure 2)
If you have already added your new layer make that layer active by clicking on its name in the Layers menu so that it's highlighted.
If you wish you can now delete your original object. Or, if you want to remove (cut) your object from one layer and Paste it to another, simply press the Cut button at step 2 instead of the Copy button.
Having problems getting it to work? Keep the following in mind....
Once I make the layer visible the pasted image appears.
Do you want to copy images from one mat layer and place them on a different mat layer? Well here's how you do it.
1. First, make sure you have Mat Layers enabled (Options menu, Craft Room tab).
You may also want to have Fill Mode Enabled (Options menu, Craft Room tab) but it's not necessary. For this exercise I have it turned on to make it easer to see where the layers are being pasted to.
2. Highlight the object you want to copy and click the Copy button. That image will be copied to your clipboard.
3. Click on the Mat Layers menu and click the Add New Layer button. (Figure 1). That layer will now become the active layer. You'll know that because that layer will be highlighted in grey. (Figure 2)
If you have already added your new layer make that layer active by clicking on its name in the Layers menu so that it's highlighted.
| Figure 1 |
| Figure 2 |
4. Press the Paste button. Your object will now appear on the new layer.
You can see that it worked because the pasted object is a different colour to the original and matches the coloured dot beside the layer name.
If you wish you can now delete your original object. Or, if you want to remove (cut) your object from one layer and Paste it to another, simply press the Cut button at step 2 instead of the Copy button.
Having problems getting it to work? Keep the following in mind....
- Before you select the Paste button ensure that the layer name you are pasting to is highlighted.
- Make sure the layer you are pasting to is visible. The eye next to your layer name should be green. (Like the picture above). If the eye is grey your layer is hidden and you won't see your pasted object.
In the picture below, the layer I have pasted to is hidden. (The eye is grey.) Even though I have pasted my object it's not visible.
Once I make the layer visible the pasted image appears.
Subscribe to:
Posts (Atom)