
http://cricutcraftroomblog.blogspot.com/2011/07/printing-and-cutting-disney-layers-on.html
Today I want to show you how to take that one step further, using the Hide Contour feature.
Many of the layers on the carts are made up of more than one shape. For example the Pluto image on the Mickey Font cart has a collar that doesn't align correctly because it is made up of 3 separate parts. The part on the left doesn't align properly with the other layers of the object.

This is how it looks not aligned properly beside how it should look:


Now, let me show you how to achieve that using a second copy of the collar and the Hide Contour feature.
Place all the parts of Pluto except for the collar on the mat and align them correctly on top of each other.
Don't forget to select Don't Weld on each of the layers. I just picked any old colour from the colour palette for this example.
Place two copies of the collar on the mat. You can colour them now or later when you place the object on top of the other layers. I've coloured them here so it's easier to see.
Note: Don't use Copy and Paste to create your second copy of the object. Pasted objects don't work well with the Hide Contour feature. Quite often the whole object will be hidden instead of just the contour you are clicking on.
We only need two copies of the collar because it is only the left hand part that doesn't align. The two right hand parts are in their correct positions and don't need to be separated.

Select the first collar and click the Hide Contour button

Hover your mouse over the left hand piece of the image and click to hide it.

Press the Exit button to return to the main screen.
Your image will look like this:

Select the 2nd copy of the collar and click the Hide Contour button

This time hide the two right hand side pieces

Select Exit to return to the mat.
That piece will now look like this:

To two pieces together will look like this:

Select the larger piece and move it over and align it

Select the other piece and move it over and align it.
And you're done!
So, that was an easy one to do because we only needed to hide two parts of a layer.
You'll find that many of the images on the carts will have layers that are made up of numerous parts. For example Boo(1) from the Best of Pixar cart has five parts to her face, arms and legs, three parts to her hair, five parts to her boots, smile and eyes and two parts to her pants. That's a lot of layers to duplicate and contours to hide!

And because there's no Blackout feature on this cart and I didn't want to use the Shadow for the background I hid all the inside contours of the Base image too. (Zoom is your best friend when doing this).
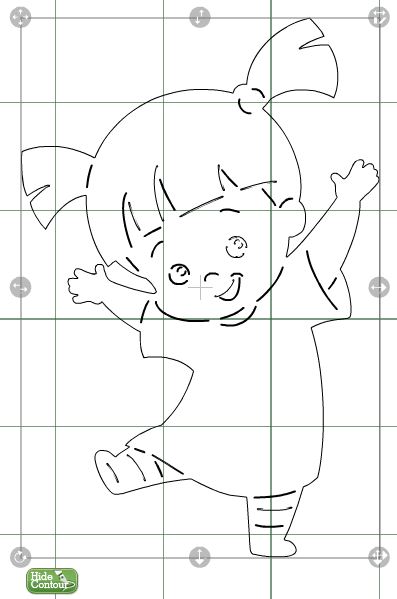

And here she is put together.

Here's another one. This is Dash from the Best of Pixar and it was a marathon effort.

Please ignore his pink eyes. I forgot to change them back to white before I printed him!


7 comments:
Thank you so much for all your assistance in doing this Narelle, I so appreciate all your hard work to make things easy to understand
Hugs
Adele
Narelle,
I have been using everything you have been showing and it's all worked fantastically! You are my hero! THANK YOU!
Narelle,
Thank you for all your hard work. I tried the first pointer about aligning the layers and I could not get my images to come out the correct size on the mat. Whether I chose 'REL or REAL' dial size all the subsequent images came out tiny and I had to resize them. Needless to say I gave up and never actually cut them. Also my Imagine will print and faintly cut but not enough to actually cut out the images when using CRC.
This same process works in Design Studio. I keep hoping that PC will correct his in an update so that hide contour can be used when you cut & paste objects. It would certainly make designing easier.
OMG - amazing. It must have taken forever
you are totally brilliant! thank you!
Wow! Thanks again for sharing your hard work!
DebbyS
Post a Comment